Deep Crankin’ for Mid Summer Largemouth: Part I
Today’s high in Phoenix, Arizona hit a blistering 115 degrees. Most of you are lucky enough to be sitting in an office. In the back ground you hear fingers clicking away on the keyboard in the cubical next to you along with the soft hum of the air conditioner, chugging along like nobody’s business pumping out a cool 76 degrees. If you’re not at the office, you’re probably in your truck sitting in rush-hour traffic on the I-10. You’re late for work, but you don’t care. As that max AC blows straight through your face you can send all the emails you need to right from your phone, lucky you.
Well not me. I’m a teacher. It’s the middle of July and the responsibilities that will eventually haunt my sleep for the next 9 months are just a blur off in the far away horizon. Now I know I should feel blessed. I have a career that I can survive uncomfortably on that gives me 3 months off to do whatever my heart pleases. But why (and yes, I know I just began a sentence with the word “but”) do those three months have to be during the toughest time of the year for bass fishing? Would it destroy society as we know it if the school year lasted from May to January?
As you’re sitting there in your comfy office chair reading fishing reports behind your boss’s back, I’m out here sweating it out in the trenches to bring you those reports. This summer’s field research project deals with a technique that I think many anglers overlook during a time when everyone is focused on slowing down their presentations in order to tempt a hot, lethargic, summer bass: Deep cranking.
Step 1: Pick a crank bait
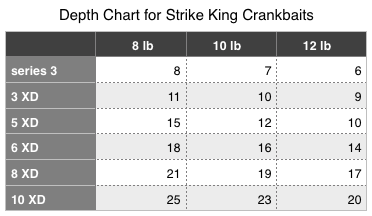
So which crank bait should you try? Like the menu at Taco Bell, It really doesn’t matter, it’s all the same stuff wrapped up under a different branding. However, I suggest you stick with a single company that has a wide range of deep divers. I find that it’s easier to learn one company’s system for their whole line of baits rather than picking and choosing random models from five different makers. For this reason I chose to go with Strike King and their XD line of baits. Take the number, multiply it by three and you will get fairly close to it’s maximum diving depth. Below is a chart I’ve compiled of how deep each one will run given how heavy of line you use:
Step 2: Change the hooks

Story time; about 6 weeks ago I fished a motorless night tournament at Saguaro Lake. I got my ass handed to me (more like thrown in my face by the left hand of a 2001 Randy Johnson). I went 0 for 7 on decent sized bass that hit my 5XD and immediately swam up and spit the hook while airborne. Heartbroken, I returned to weigh in two hours early empty handed to find 5 gallons of water in my kayak’s hull (but that’s a different story).
The next day I changed my hooks. I was never a big proponent of changing hooks. I thought it was just something the hook companies wanted you to believe was important, but I put on a fresh new set of Gamakatsus anyway, and it paid off. Two weeks later I hooked up over 20 fish and only lost one when he got tangled up in a dropshot rig I had dangling over the bow. I won that tournament with a three fish limit of over 58 inches. That was enough to convince me that these factory hooks are an issue. In the diagram below you’ll see the hook size I recommend for each bait I’ve been testing:

Step 3: Use the right gear
Ideally I’d love to be able to take nine crankin’ sticks out with me each day. In the perfect world I’d have three 6 foot medium-fast action, three 7 foot medium-fast actions, and three 7 foot medium heavy-fast actions. On each of the three I’d have one rigged with 8 lb, 10 lb, and 12 lb test fluorocarbon line. With those nine rods, I could efficiently fish crank baits from 8 to 25 feet hitting nearly every depth in between. Remember though, I’m a teacher… So I use two.
For baits up to the 6XD, I use a 6’6” medium-fast action. I prefer using a glass rod as it has more of a parabolic bend. That longer bend will give you more cushion on the hook set. What I mean by this is, when you set the hook, the rod will give in a bit more, delaying the hook set by a fraction of a second. That little delay will allow the bass to take the bait just a bit deeper to give you more of a chance to hook him with both treble hooks.
For the bigger 8XD and 10XD I use a 7 foot medium heavy rod, basically my jig rod. There’s a few reasons for this: For one, it’s a big, heavy, bait. Throw one of these bad boys on a light rod and you’re likely to snap the tip on the cast. Another reason is that the hooks on these guys are beasts. These are not your standard little trebles, these hooks are thick. You need quite a bit of power in your rod to get these suckers to stick to the fish. Unlike a smaller crank, the fish typically won’t “set itself” on these thicker hooks, you need to rear back on them the same way you would a jig or Texas-rig, perhaps even more. Think of it this way: The force you put behind a hook set on a single hook (like a jig) will be divided by the number of hook points that are pressing into the fish. It’s the same concept being used when a street performer lies on a bed of nails. You really have to hammer that dude to get any of those nails to break the skin!
I don’t have a preference for rod makers. Nah, that’s a lie, I do. However, until someone give me free gear and pays my tournament entries, I don’t have a preference for rod makers. ;)
Step 4: Pick a color

I use the K.I.S.S model when it comes to selecting colors. What kind of bait fish are in your lake? Shad? Use a shad color. Bluegill? Use a bluegill color. The lakes around the Phoenix area are filled with shad. I can’t take a piss out on the lake without stirring up a school of these guys. Honestly, I don’t even put much thought into water clarity when choosing the color of crank baits. They are reaction baits that put out lots of vibrations and rattling sounds. The visual aspect is, in my opinion, the least important factor. With all the crankin’ I did this summer, I only used two colors. During the day I used the “sexy shad” color pictured above.

At night, I switch it up with the “green gizzard shad”. I really like this color at night. It’s dark, which creates a silhouette, but it’s also metallic and reflective. Every now and then it will catch just a glimpse of moonlight, or light from a nearby boat dock or head lamp. That quick little flash of dim light is just enough to catch the attention of any nearby bass.
Step 5: Find a spot
One of the toughest parts of this summer’s deep crankin’ experiment was forcing myself to pull away from the bank. I grew up throwing squarebills, topwater poppers, and Texas-rigs. Targeting shallow, visible cover was the only fishing I had ever done. I rarely looked at topo maps, and I didn’t own any marker buoys. Does this sound like you? If so, the best tip I can give you is to visualize what the lake would look like with 20 feet of less water in it, place marker buoys along the drop-offs, then fish it as if those marker buoys were the shore line. Many lakes around the Phoenix area already have a lot of great areas clearly marked with various kinds of buoys. Even if those buoys aren’t set up along long stretches of bottom structure, something is anchoring them to the bottom, and that something might just be holding fish. Try running a bait by it and see what happens! Below you’ll see two of my favorite types of bottom structure.
Ledges:

Above is an example of a ledge. Navionics makes it pretty easy to find ledges on their webapp. The areas in blue are typically less than 20 feet deep, so look for areas where the contour lines bunch up together and have blue on one side, and white on the other. These are ideal ledges for deep cranking as the fish will typically bunch up on them in 15 to 25 feet of water in during mid-day. Use two (or more) marker buoys to mark where the ledge is, then fish the path between your buoys as if it were the bank.
Ledges will usually have a “sweet spot” that will hold multiple fish, so once you catch one stick around and make the same cast over and over, most likely there are more where that came from. A third marker buoy will help you make this same cast. I like to keep one right by my feet, that way the second I get hit, I can quickly kick it over the side to mark the exact place my boat was when the strike occurred. At the same time, take a mental note of the shore off in the distance, look for a landmark that you can remember casting toward so that you can copy the same angle again. A fish can pull you around quite a bit in a kayak and the wind can blow you a good deal while you unhook the fish and take pictures. When you’re far off the bank, it’s difficult to remember exactly where you were just fishing. You may think you’re making the same cast over again, but you could easily be 20 yards off the mark if you are extra observant. When the strike zone may only be a small 5 foot wide diameter, that can be the difference between a 20 lb limit and just one single fish for the day.
Points:

Points (and secondary points) are another key location to look for deep summer bass. Like ledges, look on Navionics for “peninsulas of blue”. As you can see in the example above, you can’t always rely on the shoreline to find points. In this example the bank is a long, straight, wall of riprap. The point is entirely submerged, you need a topo map, depth finder, or a Carolina rig and a lot of time on your hands to find it. Like I mentioned earlier, imagine that there is 20 feet of less water in the lake. If that were the case, you would see the point as a shoreline point. If you struggle to visualize the point, drop a marker buoy at the end of the point and make casts in several directions everywhere between your buoy and the shore. Every thing about the marker buoys apply to points just as they did about ledges. On a tough day, the angle of your cast could mean everything. If there is a breeze or current, I’ll start by casting into it and retrieving the bait back across the point with the direction of the breeze or current. If that’s unsuccessful I’ll work my way around the entire point casting to the shallow water and working down the slope on all sides.
You may have noticed this particular point has a hump on the end. There are quite a bit of examples like this throughout the Salt River chain of lakes. You’ll also find the occasional isolated hump all on it’s own. For practicality’s sake, a hump is just a point with four sides instead of three. Fish it the same way.
Step 6: Consider what you are doing
You've been working hard all week to support yourself and your family. Now the weekend is here and you want to go spend the day in 110 degree heat chasing after a fish that you are just going to release back to the water after looking at it for a minute or two? How much money did you spend on the equipment for this? How many hours did you work to earn that money? Shouldn't you probably use all this effort and money to make the world a better place? You could have slept in today, but instead you wake up even earlier than on days you have to go to work?
No? Still want to go piss off a fish by feeding him a fake breakfast full of hooks? Cool, me too. Check back here next week for the last four steps of Deep Crankin'. I'm going to tell you all you need to know about finding the "sweet spot" I mentioned above, as well as a few different ways to work a crank bait, and more of my opinions on hook sets and fighting the fish.
Let me know what you think down in the comments or on social media. If any of this has helped you catch a fish on your latest trip, let me know! As a teacher I always get more of a kick out of helping you catch fish than catching them myself!
Awesome article, David! You rock!
ReplyDeleteGood write bro.
ReplyDeleteI'm definitely enjoying your writing... and your fishing. Thanks!
ReplyDelete