Thursday, December 31, 2015

Fishing Resolutions For A New Year

Fishing Resolutions For A New Year:


I've never been the kind of person to set New Year's Resolutions for myself.  I live my life fairly regret free, and I'm content with my every day lifestyle.  So why even try to quit my beloved Dr. Pepper until my non-peppered actual doctor tells me to?  It's not like I'm going to actually succeed in that anyway!


With that said, I have some things I'd like to do, and some changes I'd like to experiment with when it comes to bass fishing.  These things aren't necessarily "resolutions".  They aren't even necessarily changes for the better.  Honestly, they may not even be things that I want to do all year.  They are just some things I want to do, or experiment with just for the hell of it.  However, since it just happens to be New Year's Eve, let's go ahead and call these my New Years Fishing Resolutions:

1. Catch a fish on a lure I make myself.

I've made a few jigs and inline spinners the last few months but haven't given them a real shot yet.  Fishing has been slow lately so I've been sticking with the tried and true methods to at least get a few bites each trip.  Once these waters get warmed up and the fish are hungry again, I will catch something on those homemade lures!

2. Find a line I like and stick with it, then buy it in bulk to save money.

I just want to make each trip to the store a bit simpler.  Every time I step into a Bass Pro or Sportman's Warehouse I remember that one reel sitting on the shelf and I think of the myriad options of what I could do with it.  Then I stand in front of the wall of available fishing line and stress about the perfect choice.  It would be so much easier just knowing I have 5 bulk spools at home to do whatever I want with.

3. To save more money, make that line a copolymer and use it on everything (except finesse rods).

I know how important line is.  And I know that not using the "right" line for the technique might affect how many fish I catch.  However, I'll never really know unless I give it a good honest shot.  This is one I want to do all year long so I can compare my catch rates to last year when I did it the "right" way.

4. Before buying a new rod, sell an old rod.

I need a heavy flipping and pitching rod. I have four crankbait rods.  If you're looking for a decent used crankin' stick, let me know in the comments!

5. Actually act on one of my ideas to try to make some extra money on the side through fishing.

I have three ideas.  One of them might just turn out to be a promising business endeavor...  If you have a degree in business, if you know your way around web design, or if you own a fishing guide business and are looking to expand, let me know that in the comments too!

6. Help my wife catch her first fish.

Seeing as my wedding is in two days, I feel as though I should add in something about her in my New Year's Resolutions... If that is what these are....


There it is, six things that I might actually do this new year.  I've also told myself that I'm going to stop drinking energy drinks.  So if we're fishing together in the future and you notice a Monster in my hand, feel free to give me crap about it, not that it's actually going to make me stop drinking it, but it's always fun to give each other crap.

So do you have any fishing related resolutions this New Years?  If so let us know in the comments below or on Facebook!

Tight Lines to you all in 2016!

Friday, December 18, 2015

A New Way To Organize Soft Plastics

Organizing your tackle, specifically soft plastics, is a discussion that comes up time and time again in bass clubs and on internet forums. Keeping your gear organized can mean the difference between catching a twenty-pound limit and weighing in just a handful of dinks.  Wether you're a tournament angler or a weekend warrior, organization is vital to keeping the frustration out of the boat and a hook in the water longer; which is really the key to catching fish.  You can't catch them if you're busy tying on hooks and juggling your terminal tackle.

When you're fishing from a small boat or kayak, issues with organization seem to magnify and simple frustrations can lead to dangerous situations if you're hit with an unexpected wind gust or boat wake.  Many of the common solutions for organizing soft plastics may be sufficient in a bass boat or when you're fishing from shore, but there's added struggle when trying to work in such limited space while kayak fishing.  After two years of kayak fishing, I have finally developed a system that works for me, maybe it will work for you too.

The system is basically the same system that I, and many anglers, have been using for years to organize hard baits: technique specific Plano boxes.  Almost every serious bass angler has several Plano boxes, one for jerkbaits, one for deep diving cranks, one for top waters and so on.  Why not adapt that same system to our soft baits?  Say you're fishing medium diving crank baits, my strategy would be to leave my crankbait box out until I find just the right depth and color needed to get hit.  If I'm fishing Texas rigs, trying that strategy will result in a mess.  I'd end up having ziplock bags of plastics, hook boxes, weight boxes, and other various terminal tackle all over the place.  So it finally hit me, I need a Texas rig box!

Texas Rigs


Now, certainly this one box of stuff isn't all of my potential gear for Texas rigs, but it will suffice for a day or two of kayak fishing.  The colors, size, or shape of the baits I bring will slightly change throughout the seasons and at different lakes, but the majority of this box stays simple and consistent all year round.  I prefer offset round bend hooks on Texas rigs, and I generally match the weight with the hook.  This allows me to keep things that would normally be in two separate boxes into just three compartments in one box.  I don't need a separate box filled with all sorts of hooks if I know I'm only going to be using three all day.

Dropshot


Just like the Texas rig box above, my dropshot box holds all the plastics, hooks, and weights needed for the technique.  If you dropshot often you'll know that the weights break off often and such small worms don't last more than a few fish.  Having one box on the deck with everything you need makes retying the rig a quicker process so you can get that hook out there again sooner.

Small Swimbaits


Like the above examples I keep with me just a small selection of colors and sizes.  If one of those colors or sizes won't get hit, then I'm probably going to switch to a whole new technique rather than trying other slight variants of swimbaits.  Again, I use different hooks with swimbaits than with other plastics, so instead of having a second box with twenty different hooks to sort through, I just keep a few types of swimbait hooks in the same box.

Shaky Heads


For the longest time I had a "Finesse Box" where I kept all my dropshot, shakey heads, and weightless stuff all together.  I quickly found though, especially in Arizona lakes, that finesse techniques are important enough and deserving enough for their own boxes.

Senkos


There's only three ways I ever fish Senkos: weightless wacky, weightless t-rig, and nail weighted.  This one simple box covers it all.  This is also the only technique I use extra-wide gap hooks.  So rather than getting them all mixed up in other various hooks I just keep them with the other Senko stuff.  I keep the O-ring tool right in there too because once again Senkos are the only thing I use it for, so why keep it anywhere else?

Jigs


Most of us already have a jig box.  Leave a couple compartments free and before your trip toss in three or four different trailers.


Bed Fishing (Stop reading now if you have a stick stuck up your butt):


This one box is probably responsible for more fish than any other box, and it's only used about two months out of the year.  When bed fishing it's even more important to re-tie and switch lures quickly.  If you have a fish agitated and ready to strike but it won't hit that size or color of lure, you don't want to give it five minutes to relax while you're fumbling around with your tackle.  The quicker you can get a bait out there, the sooner you can get that bed fish to bite.


Since I've started this system, I really haven't encountered any major issues.  The particular boxes I take with me are designed around whichever lake I'm going to and the current season.  There may be trips where I only take one or two boxes.  On other days I may take six or seven.  One of my biggest struggles when I first started kayak fishing was feeling the need to take everything with me.  Unfortunately we don't have rod lockers and acres of storage like you would find on a 20 foot bass boat.  You need to do your homework in advance to know what techniques to focus on as taking every lure you own may not be practical.  My next post will be a write up on the "homework" involved with kayak fishing and will be filled with information to help you decide which boxes to take and which to leave behind.

Think this solution might work for you?  Do you have another solution to the soft plastics fiasco that resides in kayak crates across the country?  Let me know in the comments below!

Tight lines!

Tuesday, November 24, 2015

Would You Trust a Paper Clip?

My favorite part of Bassmaster magazine is the half-page write up titled "10-Minute Angler".  In this section editor James Hall gives a quick run down of simple DIY projects that nearly any competent angler can complete in just 10 minutes.  Unfortunately, I'm not very competent by my own definition because I was having a hell of a time bending and unbending paper clips for half an hour trying to test out November's project; a pre-rigged Carolina rig shortcut.


When I first saw this month's project, my pessimistic skeptic side took over:  There's no way I'm trusting some cheap little piece of crap office supply as an added link between myself and a big mean largemouth!  And then I saw a spinnerbait sitting on my coffee table.  We all trust a thin piece of aluminum on almost all of our hard baits, so what makes a paper clip any different?

Still feeling skeptical I decided to put it to the test (after all, I should probably use my weight bench and set of weights for something) so I grabbed a ten pound weight and hauled it to the sofa.  The first thing I discovered during my control test was that 10 lb test line won't support a 10 lb weight...  That's right, we're all getting jipped...  So I grabbed a 5 1/2 lb weight, good enough.

I was surprised by the results.  The paper clip held just fine in all of the tests I put it through.  I tested many different weights and strengths all the way up to 20 pounds and every time the line snapped (usually at the knot) long before the paper clip seemed to show any signs of stress.


I don't want to infringe on any copyrights or anything, so I'm not going to discuss how to rig this beast up, but I think from the pictures above you can probably figure it out.  So would you trust a paperclip with a fatty on the line?  Any other paperclip rigs you've used in the past? Tell us about it in the comments!


* On a side note, another thing that impressed me about these tests were the quality of the Rosco Barrel Swivels I used.  Even under 20 pounds of pressure they held up strong and moved freely, much more impressive than the cheapo brand I previously used.

Tuesday, November 10, 2015

Fishhound Product Reviews

     As some of you may know, about a month ago I started writing some product review articles for Fishhound.  If you're not familiar with the site, check them out here.  They have loads of information on fishing.  Not only bass fishing, but everything from saltwater to small streams and bank fishing.
     When I first took this opportunity, I figured it would be a great way to try out some new gear and catch some fish on some lures or techniques I haven't used before.  One of the best ways to learn anything new is to get out there and force yourself to use these new baits and techniques.  Well, that hasn't been the case so far.  The good folks at Fishhound, seeing that I'm from Phoenix, thought that a good assignment for me would be a winter coat, and a hand warmer.  Now that our temps have dropped down below the century mark, I figure that now is as good a time as any to post up my latests Fishhound articles here.  I'll put the links below in case you want to check out the products yourselves.
     I know my writing is often filled with sarcasm, parody, and overall smart-ass-ness.  But I really do approve of these products.  They are very high quality at a fairly low price point, and when ever I can I like to help out small businesses.  So, for real, if you're in the need of a new jacket or hand warmer, check these out!


Refrigiwear Softshell Jacket:
            Do you like being cold on a brisk December morning?  When the temps drop into the 30s, do you eagerly await that sudden gust of wind that blows through your attire like a Chuck Norris roundhouse kick to the jaw?  When you're battling the whitecaps in your 16-foot Bass Tracker do you live for the thrill of near freezing water crashing over the sides reminiscent of the cold locker room showers from high school?  Well, if so then do not buy this jacket!  Aside from looking cooler than Tom Cruise riding a grizzly bear duel wielding axes, this thing is going to hold in the heat while keeping the wind and water out.  This thing is so warm that the following warning is actually written on the tag: "This garment insulates from intense heat as well as cold therefore, ignition of this garment may not be immediately realized."
            That's right, you'll be so warm that you don't even realize at which point you've caught fire!  Unfortunately for you, this jacket is also water-resistant.  When you burst into flames you'll have to trust the old "stop, drop, and roll" method as spraying yourself down with a hose or even jumping into the lake isn't going to cut it.  The water beads up and simply rolls right off leaving your smoldering torso as dry as the California drought.
            I believe it was Abraham Lincoln that said, "Anyone can make a jacket, but to make a jacket that has the potential to change the world... Well that must be Refrigiwear."  On second thought, that may have been me that said that.  I've already discussed the functionality of this jacket, but I want to take a moment to talk about some of its key features.
            First and foremost, the zipper.  This thing is built tough.  I don't know what my problem with zippers is, but if I touch one, it's going to break.  I've broken zippers on tents, sleeping bags, purses, pants, and of course jackets.  However, in all my trials with this bad boy, I've still got a fully functional zipper.  I'm amazed how easily it is to get the zipper started at the bottom, as well as the smoothness of the zip all the way up.  I can even achieve full zippage one handed without having to put my beer down.  But that's not where it ends, it gets better.  At the top, Refrigiwear has added a "tunnel" of sorts for the zipper to slide into.  This magical zipper womb will keep that chilly piece of metal contained and away from your rugged, yet sophisticated, neck-beard.  Now, as an Arizona native I'm no jacket expert, but this is a feature that has been long overdue in my repertoire of jackets.
            Let me ask you another question.  Do you like holding things?  Of course not!  But don't worry, this jacket has got you covered with pockets.  In fact it has four of them.  These pockets are great for holding all kinds of objects; keys, wallets, grape fruits, hamsters, the list just goes on and on.  If you're the kind of person who limits their pocket use to hands, you are really missing out on an adventure.  Each of the four pockets comes with its very own zipper just as great as the one described above so there's no need to worry about that grape fruit escaping and causing an embarrassing scene.

            If being warm and dry with top-of-the-line zippers and pockets sounds like an enjoyable way to spend a cold day out on the water, then I highly recommend the Softshell Jacket from Refigiwear.  It will definitely keep you warm while looking cool.


Roo Outdoors Inferno Hand Pouch:


     Winter; it is a tough time for many anglers.  For some, winter means that it's time to store the boat away into the back of the garage where it becomes nothing more than a $30K shelf with a sparkly gel coat.  For those of us in the warmer climates, winter means the fish move deep, their metabolism slows and they only feed once or twice each day.  Wherever you are from San Diego to Maine winter generally means lower catch rates.  Unfortunately, there are several reasons for this.  The good news is that the more we understand why fishing tends to slow down in the colder months, the better we can counteract the elements and discover ways to put fish in the boat.  One simple way to increase your success in the colder months is to keep your hands warm with the Roo Outdoors Inferno Hand Pouch.
     There are countless variables that go into fishing during different seasons.  One article cannot possibly cover all of them across a geographical area as large as the United States.  However, there is one variable that I find to be consistent no matter where you are, what technique you use, or what species of fish you are after:  It gets colder in the winter.
This review of the Roo Outdoors Inferno Hand Pouch is not about keeping warm, it's about catching fish!  Keeping warm is easy; heavy socks, heavy gloves, and a warm hat are all you need.  Keep those extremities warm and you'll be comfortable in those low temperatures.  However, the problem an angler faces is the heavy gloves.
     Often times, fish will go deep in the winter.  They become lethargic and won't travel far to chase down bait.  This results in very subtle bites, especially when using finesse worming techniques like a dropshot or shakeyhead.  Bass anglers especially will spend hundreds of dollars on high-end sensitive rods and braided line to maximize the sensitivity so they can feel every last detail of that bait.  Unfortunately, all of that goes out the window when you begin layering gloves over your hands.  So what's the best option?  Suck it up and lose the gloves?  Of course not, a shivering cold hand won't pick up the slight tick of a line when the bait is quickly inhaled by that 8-pound bass any better than a gloved hand will.  Recently I got my hands on, and in, the Inferno Hand Pouch by Roo Outdoors.  This is the product I've been waiting for; I just didn't know it!
     All my life I've been struggling with a solution for keeping my hands warm while fishing, and the Inferno Hand Pouch finally fills that need.  Just strap it on, and it's there when you need it.  Fish as you normally would without the restraint of heavy winter gloves.  When you start feeling that chill, pop your hands in for a quick warm up.  Roo Outdoors even includes a couple 10-hour heat packs that you can pop in to get warm faster.
     Of course there are other hand pouches on the market, but the Roo Inferno stands out above the rest because of some clever engineering.  The materials used are high quality, the outer Neo-Shield shell paired with the inner PolarTec insulation creates revolutionary warmth at only 7mm thick allowing the pouch to easily contour to any body shape.  Also, the heavy-duty belt is lined with silicon grippers that keep the pouch in place all day long.  But my favorite aspect of the Inferno Hand Pouch has got to be the utility pocket on the inside.  The bonded zipper on this pocket creates a waterproof seal that keeps all your valuables safe and dry.  This is the biggest plus for me as I frequently fish from a kayak and getting wet is the norm.  Even as the days warm and Spring gets underway, I may continue to take the Roo Inferno with me just as a safe place to store my phone or camera with quick and easy access.
     Starting at only fifty dollars, the Roo Outdoors Inferno Hand Pouch is an investment that will surly pay off this winter.  Don't get caught out there on the lake missing bites because of your cold hands.  Get the Roo Inferno and start catching more winter fish today!


Want to see more?  Check out these products and more at the links below:


Wednesday, September 23, 2015

The Donkey Shot

The Donkey Shot

Welcome to Fall!  For those of you overseas who don't know what I'm talking about, I'm referring to Autumn.  Here in 'Muricha we call it Fall 'cause leaves fall down.  Fall is my favorite time to fish (yep, even more than Spring) because the fish are much more active and willing to leave their homes to chase down bait.  You can throw just about any shad-imitating lure and pull in a limit before the day is done.  For me, Fall is all about the numbers, weeding through the dinks until you find the bigger ones.  And what better way to do that than to catch two bass at once!  (Keep in mind that this may be illegal in some states, know the law in your area before heading out to the lake!)

At this point, many college students who Googled "Donkey Shot" are probably wondering why I'm talking about fish, here's the link you want:  
http://www.drinklab.org/cocktail-recipe.php?ID=6728&Name=Donkey%20Punch&Type=Shot

Ok, now that they are gone, let's talk fishing.  What is a Donkey Shot?  Basically, it's a double fluke rig (aka the Donkey rig) turned vertically.  This double-drop shot set up is nothing new to fishing.  Salt water fisherman have been using a multi-hook drop shot rig since the 1950's.  In fact, many fishermen put way more than two hooks on.  It's not uncommon to see a string of ten or more hooks.  This was an easy way to determine the depth of the fish long before quality sonar units were widely available.  Here's a simple little diagram of the double-drop shot:


There's a lot going wrong with this simple little set up.  First of all, baitfish typically won't position themselves right on top of each other like this, it's just not a very natural presentation.  Secondly, the baits will not work independently of each other.  When you shake the rod tip, those little worms will be dancing as one like a couple of synchronized swimmers, not natural.  And lastly, what if you catch two fish?  (And if you fish this rig enough, it will happen.).  They will be fighting against each other with only about 18 inches of line separating them.  With no way to keep tension on the lower one, you will be lucky to only lose one fish!  So how do we fix these issues and rig this up as a bass killin' machine?  Enter: The Donkey.

What you will need:


Two finesse worms (4-inch Cactus Wren Quail Tails)
Two dropshot hooks (Size 1 Gamakatsu Octopus Hooks)
Two swivels
One dropshot weight
One clear glass bead


Step 1: 

Tie two leaders to each of the swivels.  One leader should be longer than the other, about 16 inches and 24 inches should work well.  You don't have to tie the leaders first, but I do it in this order so that I can use a palomar knot for all my connections.


Step 2:

Thread onto the main line the shorter of the two leaders (do not tie that swivel to the main line, just thread it on and leave it).  Then thread on the clear glass bead.  Once those are in place, tie your longer of the two leaders onto the mainline using a palomar knot and trim off the tag end.  What you have now is two leaders coming from the main line, the shorter leader should be on top and can freely move up and down the main line.
The purpose of the glass bead is two-fold.  It will click against the swivels attracting schooling fish to the area, but more importantly it helps protect the knots used on the swivels. 


Step 3:

Tie on one of the hooks to the shorter leader.  This half is done.  The worm you put on this hook is essentially a weightless worm that will subtly sink and glide over the top of a standard drop shot rig.


Step 4:

On your longer leader, tie up a drop shot as you normally would.  If you don't know what I'm talking about, click the link over to the right and read my post about the drop shot rig.


Step 5:

Take a second to make sure that the top leader is short enough that the hook can't reach to the lower hook.  If it's too long, just cut it off and retie it closer to the swivel.  This top leader can't be too short in my opinion, it's just difficult to tie a hook on a short line is all.


Step 6:

I nose hook my worm 90% of the time on a normal drop shot.  With this rig it's 100% of the time.  I recommend only using this rig in open water, there's just too much going on, it will snag and get wrapped up very easily in any cover.  Since you're in open water, you won't have issues with snags anyway and the nose hook will give your worms much better action.


Step 7:

I always start with two different colors, and I'd suggest putting your confidence color on the bottom as it will typically be the higher producer.  If you find that one color is producing much better, switch the other to that one too for your best chance.


Step 8:

Fish this rig the same way you would any old drop shot.  Basically you are fishing a drop shot and weightless rig at the same time, and if you read my previous posts, you'll know I fish those two rigs the same way anyway!  As I mentioned before, I only throw this in open water as it's just too easy to get all that stuff tangled up in cover.  If the fish are actively schooling and chasing down baitfish, open water is where they are going to be anyway.
When you get bit, it's even more important to reel down until you feel the weight of the fish.  If the fish took the upper worm, you need to make sure that the top swivel is in contact with the glass bead and bottom swivel or you will not get hook penetration on the hook set.


Step 9:

After the hookset, keep your line tight but don't bring him in right away.  Let him swim around out there for a bit dragging that other worm behind him.  That's how you're going to catch two fish at once.  Think about how many times you've caught a fish and as you bring him to the boat you see two or three of his buddies following right behind.  With this rig, that fish is going to be caught too!

This is Franklin.  He liked the Donky Shot

         Have you tried the Donkey Shot, or a similar approach?  Tell us about it down in the comments, and if you try it for the first time from reading this, let us know how you did!


Tuesday, September 1, 2015

The Music of Topwater

The Music of Topwater


     Here in Arizona the fall topwater bite seems like months away, but as September gets underway and the Halloween Warehouses begin to pop up around town the visions of topwater explosions begin to fill my dreams at night.  Once these daily high temperatures begin to drop down into the 90s and the night time lows start to cool down our desert waters, throw some monofilament on your favorite baitcaster and make sure your iPod has a full charge.  I'm about to let you in on a secret of mine that I've been perfecting since I was a kid!

     Pop, pop, pause...  Pop, pop, pause....  Big bass have seen this presentation hundreds of times.  It may have fooled them when they were young and feisty two-pounders, but it's not going to work anymore.  I don't keep a detailed log of my catches, but I don't recall ever catching a big bass using this standard topwater cadence.  To catch a monster, you have to show them something new, even borderline unnatural.  Fish don't have hands, if they see something interesting and want a closer look, they've got to put it in their mouths.  What's more interesting to a fish than the classic beats of The Sugarhill Gang?


Jump On It - The Sugarhill Gang


     This "Jump On It" cadence is fairly simple, but very effective.  Pop it along with the rhythm of the early 90's synthesizer and pause for the "Jump on it, jump on it, jump on it, jump on it."  That's a pretty long pause.  Letting it sit motionless like that right over a curious bass is going to drive him nuts.  He might even JUMP ON IT!  (Wow, what a bad joke that was....)


Don't Stop Believing - Journey


     Chug your popper along to the bass line of this powerful rock classic.  The quick, steady tempo imitates a fleeing baitfish.  This is a cadence I use more often in open water targeting schooling fish, especially when you see the boils on the surface.  It works well with walking style lures and prop baits as well.


Another One Bites The Dust - Queen


     For a lighter more subtle presentation give the ole' Freddy Mercury a try.  I like to use a smaller popper or floating minnow jerkbait with a lighter twitching motion than a full pop.  "Twitch, twitch, twitch, another one bites the dust" pausing on the lyrics just like Jump On It above.  Break it down and you'll find that this is just a slower version of the Journey cadence above.


Rite of Spring - Igor Stravinsky

(Skip to the 4 minute mark)

     You might need a bachelors degree in fine arts to pull off this early 20th Century classic.  Stravinsky uses asymmetric meter as well as off-beat accents to pull off his aural representation of ancient pagan rituals.  At its Paris debut, the Russian ballet caused outrage and riots, audience goers were found setting fires and flipping horse-drawn carriages like it was L.A. in '92.  If this provocative sample of musical pornography can cause old French women to loot the Monocle Shoppe, then imagine the strikes this erratic action can trigger from a hungry largemouth!


Stayin' Alive - The Bee Gees


     We'll round out my top five topwater cadences with the 1977 disco classic by the Bee Gees: "Ah, ah, ah, ah, stayin' alive, stayin' alive".  Give the bait a pop on every word except "alive".  This is a relatively steady retrieve that will work for frogs and poppers, but where it really shines is with walking lures.  Repeat the pattern over and over again.  The short and consistent pauses on "alive" will be enough action (or lack of action) to trigger the strike from a bass that may only look at or follow the same bait with a steady retrieve.


     Did I leave out your favorite tune?  Tell me in the comments below if there are any songs you steal your cadences from.  And as always, let me know if any of the beats above lead to you catching a musically inclined hog!

Friday, August 21, 2015

Deep Crankin' for Mid Summer Largemouth: Part II

Deep Crankin' for Mid Summer Largemouth: Part II

     Well here we are in mid-August.  In most of the country bass fisherman are beginning to gear up for one of my favorite times of the year.  The shad are getting larger and the bass will soon be following them up into the shallows and the backs of creek channels.  Fall is the time of year when you can catch them on top-water all day long.  Soft weightless jerkbaits and spinnerbaits will soon be flying off the shelf as the bass make their way through their end of summer migration.
     The problem of course, I (and most of my readers) live in Arizona.  The back-to-school season is in full bloom, and of course that means we still have 3 months of summer left.  Fishing is still tough around the Phoenix area, so you only have a few options.  1.  Take a drive to the high country, there's surprisingly great bass fishing up there and with temps in the 80s you can still get away with throwing most of your post-spawn tactics.  2.  Keep tossing that dropshot rig around and have a blast catching 13 inchers out of 25 feet of water.  Or, 3.  Read my blog, then use that information to catch a toad!
     If you haven't yet, before reading this post, go click on part I of this article.  Another option, be lazy and read the following review from last week's lesson:

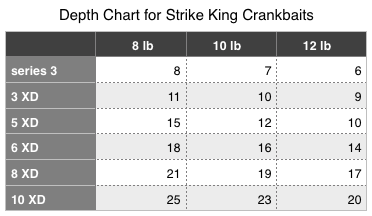
Step 1: Pick a brand of crankbaits.  Strike King and Rapala both have many options of baits that will allow you to effectively fish from 10 to 25 feet.  There's many great companies out there, but these two companies have the widest range of baits that will fit most angler's budgets.

Step 2: Change the hooks.  Just do it.  It won't make for a very memorable evening, but you'll be happy you took the time to do it later this weekend!

Step 3: Use the right gear.  Medium power rods with a soft tip work great for most crank baits.  As you get into the real big guys (8XD and 10XD) I suggest upping the power to a medium-heavy in order to get those bigger treble hooks to stick.

Step 4: Pick a color.  I use shad color baits 95% of the time because I fish in lakes loaded with shad.  If you decided to head up north, or to the White Mountains lakes, grab a handful of bluegill and baby bass colors, those lakes don't have shad and your bait will be unnatural to the fish.

Step 5: Map study.  Find ledges, points, and humps in the 15 to 25 foot deep range.  Stick to the main lake or channel swings where there is deep water nearby.

     Alright, on to the new stuff.  Below I'm going to discuss the finer details.  How to fish specific cover, various retrieves, setting the hook, and some more random tips that didn't really fit into a category of their own.


Step 7:  Pay attention to your sonar

     Wait, what about step 6?  Is that what you're wondering?  If so, you were lazy and just read the quick review above.  Stop it, go read part I, slacker....
     So you’ve found a location that, based on bottom contour, looks like it should hold bass.  I mentioned earlier that there will often be a “sweet spot” in these locations.  The “sweet spot” is seldom random, there’s usually something down there (a rock, brush pile, grass bed, etc.) that the fish are holding onto.  Not every piece of isolated cover will hold fish, but you should fish it anyway.  Even if you don’t see an arch on your graph, it’s worth throwing a bait to.

     The picture above shows a boulder sitting on a gravel bottom.  Hard surfaces translate as red and oranges while softer surfaces will show as blues and greens.  In this image, you can see how the bass position themselves on and behind the boulder to ambush the baitfish as they pass by.  Use that information when deciding upon your presentation.  Bass don’t like it when the bait comes up from behind them.  The best approach in this situation would be to cast out beyond the boulder and pull your bait through the cloud of baitfish and deflect it off the boulder right in front of their faces.  (Remember, the graph shows what is under your boat over time, meaning that the bait fish on the left side of the screen is now behind you, the bass on the right side are underneath you.)  In this situation an 8XD (20 to 23 feet) would be ideal because it gets deep enough to hit that boulder, but not too deep that it would dig into the gravel and get hung up on the front side of the boulder. 


     This image shows submerged grass.  Grass can be tough to fish with a crank bait, if your depth and angle is off in the slightest bit, you’ll end up with treble hooks full of grass and the bass will leave your bait alone (baitfish swimming around with 3 feet of grass dragging behind them isn’t too often a natural occurrence in the environment).  You may find bass holding on the outside edge of the grass.  These are the bass that will be more willing to bite as they are out there for a reason (looking for food).  If you find these bass use a bait that will get down to the depth they are holding at or deeper.  In this particular case I would use a 6XD or 8XD.
     If you don’t see any fish on the graph, it’s because they are hiding inside the grass.  You can’t fish a crank bait efficiently inside the grass, but you want to get as close as possible.  Here, I wouldn’t go any deeper than a 3XD.  That bait will get you just deep enough to tap the top of the grass.  If you are still pulling up weeds with each cast, try holding your rod tip higher in the air.  A 3XD will reach about 10 feet if your rod tip is pointed down.  If held up 3 feet it will only dive to 7 feet.  Use the table at the beginning of this article, along with some simple math and you can pinpoint exactly where your lure will end up.


Step 7:  Throw it til’ your arm falls off

     There’s almost no wrong way to fish a crank bait.  A simple cast and steady retrieve will usually trigger a bite if there’s a bite to be had.  However, sometimes you need to put a bit more effort into fooling those finicky bass.  Below are a few tactics you can try to tempt even the most wary fish.

Power Fish:  Also known as “digging trenches”.  Pick a lure that runs at least 5 feet deeper than the depth of where you’re fishing.  If you’re in 10 feet of water, put on a 5XD.  Cast out and retrieve relatively quickly.  That lure will pound into bottom kicking up all kinds of dust.  This imitates a crawfish scurrying across the bottom, or even a large baitfish fleeing from a predator.

Stop and Go:  This technique imparts an erratic action to the lure, similar to a jerk bait.  It imitates a dying baitfish and does a great job attracting those finicky suspending fish.  Use a lure that runs the same depth the fish are holding.  Start retrieving with a few quick turns of the reel to get the bait down to it’s running depth.  Then simply stop and go, turning the reel handle just once or twice at a time.  This causes the bait to dart downward, then float up, dart downward, and float up.  Like a jerk bait, the bite will usually come on the pause as the lure is floating back up.

Finesse:  Like “digging trenches”, pick a lure that will dive deeper than the depth you’re fishing.  Give the reel handle a few quick turns to get the lure to the bottom, then slow it down.  Then slow it down some more.  Then, slow down.  Are you still moving the handle?  If so, slow down some more.  This slow retrieve allows the lure to lightly bounce off the bottom without kicking up too much dust.  It will look like an unsuspecting baitfish feeding on the bottom.  This technique works best in areas with sand or a fine gravel bottom.  

Fishing Up:  If you get hit within the first few cranks of the reel handle, the fish are telling you something.  Listen to them!   Schooling fish especially will feed up higher in the water column.  Use a bait that stays above where the fish are on the graph, or keep your rod tip high and keep that bait off the bottom.  When “fishing up”, your bait won’t be deflecting off anything, so any action you want to impart on it, you’ll have to add yourself with either an erratic retrieve with the reel handle, or with some pumps of the rod tip.


Step 8:  Set the hook


     Don’t trust the idea that a fish will set itself on a crank bait.  I’ve already mentioned that some of these big deep divers have huge thick wire hooks, and that any pressure you put on the hook will be divided by the number of hook points pressing into the fish.  What I haven’t talked about yet is just how easy it is for the fish to throw a crank.  These baits are big.  That means they can get leverage on it very easily and use the momentum of the bait to help throw it.  My advice is to set the hook when you get hit, and then keep setting the hook during the fight.  I’ve seen a fish jump on me with only the front hook in his lip, then by the time I get him to the boat, only the back hook is in.  If I didn’t reset that hook at some point, I likely would have lost him.
     However, don’t be afraid to wait on your hookset.  Once you get hit, watch the line.  Which direction is he swimming?  Pull your rod tight in the opposite direction.  If he goes left, turn him right with a sweeping hookset.  If he takes it down, jack him back up with an over-the-head hookset.  Most importantly, when he starts coming up drop the rod tip down and reel as fast as you can.  Dip the whole rod in the water if you have you, but don’t let him jump unless you’re trying to impress the ladies.  If you’re in a tournament with money on the line, NEVER LET THE FISH JUMP (unless you’ve got an audience of 9’s and above).  See that picture above?  Looks pretty cool, eh?  No...  I don't like seeing that one bit.


Final tips

-Invest in a “Plug Knocker”.  They can be found online for around $25, depending on the crank baits you use, it will pay for itself in just three or four trips.  This summer I snapped off probably $50 worth of crank baits/hooks before I finally decided I should get one.  Now, $75 later, I wish I would have gotten one at the start of this project.

-Get a pair of marker buoys, not just “a” marker buoy.  With two, you can mark a long extended ledge.  If you only need one to mark the end of a point or a hump, keep the other ready to drop when you get hit.  That way you can make the same cast over again.  So many times one piece of cover will hold several fish and they will only bite if the bait comes from one particular angle.  Once you find that angle, mark it and keep repeating the same cast.

-Buy more than one of the same color/model of each lure.  Often times, only one color will be working that day, and that’s the one that will get snagged bad enough to snap off.

- If you’re part of the 99%, don’t spend more than $15 on a crank bait.  Most of those lures are better at catching fisherman than fish.  Remember, a crank bait is a reaction bait.  It moves fast (usually) and the fish won’t get a good look at it anyway.  You don’t need a custom hand painted bait to catch a lot of fish.

- Don’t waste the flip!  The flip comes at the end of the retrieve, when the bait passes the end of your rod and is directly under the boat.  It will flip around before coming back up.  Occasionally, that quick flip will trigger a strike.  If you just reel quickly at the end and horse that lure back up, you’re missing out on this opportunity.  The majority of goon-fish I catch on cranks (mostly catfish) will hit just after the flip.

- Snaps and swivels.  Don’t use them.  Tie a knot like a man. 

                              I can only assume that the owner of this lure is an eight year-old.


     If you’ve made it this far, good for you.  Personally, I lost interest 15 minutes ago.  To reward you for making it to the end of this article (or two if I make this a two-parter) I will let you in on my final, yet most important bit of advice:  Always know where your bait is.  Not just how far out horizontally, but the depth at that point!  The important part of this is the “2/3 Rule”.  (Shout out to Gene Jensen for that one!)  Any crank, regardless of brand/model/color/bill will reach its maximum diving depth about 2/3 of the way in.  This means everything when it comes to boat positioning.  If you’re targeting a deep boulder, you need to be close to that boulder, real close.  Like, no more than 15 to 20 feet away from that boulder.  This is why long casts are important.  Regardless of the type of lure you’re throwing, you want to keep it in the strike zone as long as possible and a long cast is the key to doing that.


     Now, get out there and throw some cranks.  You’ll catch some nice fish, and you can skip “arm day” at the gym.  Like always, if you learned anything here that catches you a fish next time out, let me know in the comments below.  I’m a teacher at heart.  I get a bigger kick out of helping you catch a fish than catching one myself!

Sunday, August 16, 2015

Deep Crankin' for Mid Summer Largemouth: Part I

Deep Crankin’ for Mid Summer Largemouth: Part I


     Today’s high in Phoenix, Arizona hit a blistering 115 degrees.  Most of you are lucky enough to be sitting in an office.  In the back ground you hear fingers clicking away on the keyboard in the cubical next to you along with the soft hum of the air conditioner, chugging along like nobody’s business pumping out a cool 76 degrees.  If you’re not at the office, you’re probably in your truck sitting in rush-hour traffic on the I-10.  You’re late for work, but you don’t care.  As that max AC blows straight through your face you can send all the emails you need to right from your phone, lucky you.
     Well not me.  I’m a teacher.  It’s the middle of July and the responsibilities that will eventually haunt my sleep for the next 9 months are just a blur off in the far away horizon.  Now I know I should feel blessed.  I have a career that I can survive uncomfortably on that gives me 3 months off to do whatever my heart pleases.  But why (and yes, I know I just began a sentence with the word “but”) do those three months have to be during the toughest time of the year for bass fishing?  Would it destroy society as we know it if the school year lasted from May to January?
     As you’re sitting there in your comfy office chair reading fishing reports behind your boss’s back, I’m out here sweating it out in the trenches to bring you those reports.  This summer’s field research project deals with a technique that I think many anglers overlook during a time when everyone is focused on slowing down their presentations in order to tempt a hot, lethargic, summer bass:  Deep cranking.


Step 1:  Pick a crank bait


     So which crank bait should you try?  Like the menu at Taco Bell, It really doesn’t matter, it’s all the same stuff wrapped up under a different branding.  However, I suggest you stick with a single company that has a wide range of deep divers.  I find that it’s easier to learn one company’s system for their whole line of baits rather than picking and choosing random models from five different makers.  For this reason I chose to go with Strike King and their XD line of baits.  Take the number, multiply it by three and you will get fairly close to it’s maximum diving depth.  Below is a chart I’ve compiled of how deep each one will run given how heavy of line you use: 


Step 2:  Change the hooks

     Story time; about 6 weeks ago I fished a motorless night tournament at Saguaro Lake.  I got my ass handed to me (more like thrown in my face by the left hand of a 2001 Randy Johnson).  I went 0 for 7 on decent sized bass that hit my 5XD and immediately swam up and spit the hook while airborne.  Heartbroken, I returned to weigh in two hours early empty handed to find 5 gallons of water in my kayak’s hull (but that’s a different story).
     The next day I changed my hooks.  I was never a big proponent of changing hooks.  I thought it was just something the hook companies wanted you to believe was important, but I put on a fresh new set of Gamakatsus anyway, and it paid off.  Two weeks later I hooked up over 20 fish and only lost one when he got tangled up in a dropshot rig I had dangling over the bow.  I won that tournament with a three fish limit of over 58 inches.  That was enough to convince me that these factory hooks are an issue.  In the diagram below you’ll see the hook size I recommend for each bait I’ve been testing:   


Step 3:  Use the right gear

     Ideally I’d love to be able to take nine crankin’ sticks out with me each day.  In the perfect world I’d have three 6 foot medium-fast action, three 7 foot medium-fast actions, and three 7 foot medium heavy-fast actions.  On each of the three I’d have one rigged with 8 lb, 10 lb, and 12 lb test fluorocarbon line.  With those nine rods, I could efficiently fish crank baits from 8 to 25 feet hitting nearly every depth in between.  Remember though, I’m a teacher…  So I use two.
     For baits up to the 6XD, I use a 6’6” medium-fast action.  I prefer using a glass rod as it has more of a parabolic bend.  That longer bend will give you more cushion on the hook set.  What I mean by this is, when you set the hook, the rod will give in a bit more, delaying the hook set by a fraction of a second.  That little delay will allow the bass to take the bait just a bit deeper to give you more of a chance to hook him with both treble hooks.
     For the bigger 8XD and 10XD I use a 7 foot medium heavy rod, basically my jig rod.  There’s a few reasons for this:  For one, it’s a big, heavy, bait.  Throw one of these bad boys on a light rod and you’re likely to snap the tip on the cast.  Another reason is that the hooks on these guys are beasts.  These are not your standard little trebles, these hooks are thick.  You need quite a bit of power in your rod to get these suckers to stick to the fish.  Unlike a smaller crank, the fish typically won’t “set itself” on these thicker hooks, you need to rear back on them the same way you would a jig or Texas-rig, perhaps even more.  Think of it this way:  The force you put behind a hook set on a single hook (like a jig) will be divided by the number of hook points that are pressing into the fish.  It’s the same concept being used when a street performer lies on a bed of nails.  You really have to hammer that dude to get any of those nails to break the skin!
     I don’t have a preference for rod makers.  Nah, that’s a lie, I do.  However, until someone give me free gear and pays my tournament entries, I don’t have a preference for rod makers. ;)


Step 4: Pick a color 


     I use the K.I.S.S model when it comes to selecting colors.  What kind of bait fish are in your lake?  Shad?  Use a shad color.  Bluegill?  Use a bluegill color.  The lakes around the Phoenix area are filled with shad.  I can’t take a piss out on the lake without stirring up a school of these guys.  Honestly, I don’t even put much thought into water clarity when choosing the color of crank baits.  They are reaction baits that put out lots of vibrations and rattling sounds.  The visual aspect is, in my opinion, the least important factor.  With all the crankin’ I did this summer, I only used two colors.  During the day I used the “sexy shad” color pictured above. 


     At night, I switch it up with the “green gizzard shad”.  I really like this color at night.  It’s dark, which creates a silhouette, but it’s also metallic and reflective.  Every now and then it will catch just a glimpse of moonlight, or light from a nearby boat dock or head lamp.  That quick little flash of dim light is just enough to catch the attention of any nearby bass.


Step 5:  Find a spot

     One of the toughest parts of this summer’s deep crankin’ experiment was forcing myself to pull away from the bank.  I grew up throwing squarebills, topwater poppers, and Texas-rigs.  Targeting shallow, visible cover was the only fishing I had ever done.  I rarely looked at topo maps, and I didn’t own any marker buoys.  Does this sound like you?  If so, the best tip I can give you is to visualize what the lake would look like with 20 feet of less water in it, place marker buoys along the drop-offs, then fish it as if those marker buoys were the shore line.  Many lakes around the Phoenix area already have a lot of great areas clearly marked with various kinds of buoys.  Even if those buoys aren’t set up along long stretches of bottom structure, something is anchoring them to the bottom, and that something might just be holding fish.  Try running a bait by it and see what happens!  Below you’ll see two of my favorite types of bottom structure.

Ledges: 

     Above is an example of a ledge.  Navionics makes it pretty easy to find ledges on their webapp.  The areas in blue are typically less than 20 feet deep, so look for areas where the contour lines bunch up together and have blue on one side, and white on the other.  These are ideal ledges for deep cranking as the fish will typically bunch up on them in 15 to 25 feet of water in during mid-day.  Use two (or more) marker buoys to mark where the ledge is, then fish the path between your buoys as if it were the bank.
     Ledges will usually have a “sweet spot” that will hold multiple fish, so once you catch one stick around and make the same cast over and over, most likely there are more where that came from.  A third marker buoy will help you make this same cast.  I like to keep one right by my feet, that way the second I get hit, I can quickly kick it over the side to mark the exact place my boat was when the strike occurred.  At the same time, take a mental note of the shore off in the distance, look for a landmark that you can remember casting toward so that you can copy the same angle again.  A fish can pull you around quite a bit in a kayak and the wind can blow you a good deal while you unhook the fish and take pictures.  When you’re far off the bank, it’s difficult to remember exactly where you were just fishing. You may think you’re making the same cast over again, but you could easily be 20 yards off the mark if you are extra observant.  When the strike zone may only be a small 5 foot wide diameter, that can be the difference between a 20 lb limit and just one single fish for the day.


Points: 

     Points (and secondary points) are another key location to look for deep summer bass.  Like ledges, look on Navionics for “peninsulas of blue”.  As you can see in the example above, you can’t always rely on the shoreline to find points.  In this example the bank is a long, straight, wall of riprap.  The point is entirely submerged, you need a topo map, depth finder, or a Carolina rig and a lot of time on your hands to find it.  Like I mentioned earlier, imagine that there is 20 feet of less water in the lake.  If that were the case, you would see the point as a shoreline point.  If you struggle to visualize the point, drop a marker buoy at the end of the point and make casts in several directions everywhere between your buoy and the shore.  Every thing about the marker buoys apply to points just as they did about ledges.  On a tough day, the angle of your cast could mean everything.  If there is a breeze or current, I’ll start by casting into it and retrieving the bait back across the point with the direction of the breeze or current.  If that’s unsuccessful I’ll work my way around the entire point casting to the shallow water and working down the slope on all sides.
     You may have noticed this particular point has a hump on the end.  There are quite a bit of examples like this throughout the Salt River chain of lakes.  You’ll also find the occasional isolated hump all on it’s own.  For practicality’s sake, a hump is just a point with four sides instead of three.  Fish it the same way.


Step 6:  Consider what you are doing

     You've been working hard all week to support yourself and your family.  Now the weekend is here and you want to go spend the day in 110 degree heat chasing after a fish that you are just going to release back to the water after looking at it for a minute or two?  How much money did you spend on the equipment for this?  How many hours did you work to earn that money?  Shouldn't you probably use all this effort and money to make the world a better place?  You could have slept in today, but instead you wake up even earlier than on days you have to go to work?
     No?  Still want to go piss off a fish by feeding him a fake breakfast full of hooks?  Cool, me too.  Check back here next week for the last four steps of Deep Crankin'.  I'm going to tell you all you need to know about finding the "sweet spot" I mentioned above, as well as a few different ways to work a crank bait, and more of my opinions on hook sets and fighting the fish.

     Let me know what you think down in the comments or on social media.  If any of this has helped you catch a fish on your latest trip, let me know!  As a teacher I always get more of a kick out of helping you catch fish than catching them myself!